All opportunity records include multiple tabs that help you manage opportunities and keep track of any changes. The settings available in each tab are detailed below.
Details
This tab lets you control an opportunity's basic information.

| Number | Name | Details |
|---|---|---|
| 1 | Customer | Lets you link a customer to the opportunity. |
| 2 | Opportunity name | Lets you add a tag to the opportunity in the Opportunities list. This is useful when the same customer is in multiple CRM boards and you need to tell their opportunities apart.  |
| 3 | Board | Lets you select which CRM board to assign the opportunity. |
| 4 | Stage | Lets you select which stage you want to assign to the opportunity. You can easily move opportunities between CRM boards by selecting a different stage. |
| 5 | Type | Lets you select an opportunity type. Opportunity types are a great way to categorize opportunities and populate the General notes field with a template. |
| 6 | Source | Lets you select which source brought the opportunity. You can only select one source per opportunity. |
| 7 | Status | Lets you edit the status of your opportunity to one of the following:
|
| 8 | General notes | Lets you add any notes that you want admins to easily see when they click on the opportunity. If you assign a Type to the opportunity, this field is automatically populated with what you added in the opportunity type's template. |
| 9 | Responsible | Lets you specify the admin responsible for this opportunity. |
| 10 | Value | Lets you define the revenue you expect from this opportunity if you win it. For example, if you expect the opportunity to sign up to a monthly plan priced at $1,000, the opportunity's value would be $1,000. |
| 11 | Follow up by | Lets you define a follow-up date for the opportunity. For example, if you want to check on the opportunity 3 days after their tour and they visited on the 5th, you would follow-up on the 8th. You can also quickly edit this date by clicking one of the following:
|
Referrers
This tab lets you assign referrers to an opportunity.

| Number | Name | Detail |
|---|---|---|
| 1 | Referring customer | Lets you select a customer as opportunity's referrer. For example, one of your current customers recommended the space to a friend who is now an opportunity that booked a tour of your space. |
| 2 | Referring agent/broker | Lets you define an external referrer for the opportunity. For example, you hired several people to send you leads and you want to track which external agent brought each opportunity. |
This tab also includes the UTM values associated with the opportunity. These values are automatically populated based on the UTM codes of the URL that opportunity used. For more details, check out Using UTM Codes with CRM Opportunities.
Messages
This tab lets you send messages to the customer associated with an opportunity.

| Number | Name | Details |
|---|---|---|
| 1 | Search bar | Lets you find the relevant messages by typing one or multiple keywords. |
| 2 | Filters | Lets you filter the opportunity's messages by the following:
|
| 3 | Send message | Lets you send a new message directly from the opportunity's record. |
| 4 | Checkbox | Lets you select multiple messages to trigger one of the available options in the Bulk actions menu. You can:
|
| 5 | Reply | Lets you quickly reply to a message. |
Notes
This tab lets you add all types of notes to an opportunity.

| Number | Name | Details |
|---|---|---|
| 1 | New internal note | Lets you add an internal note to the opportunity's record. Internal notes are only visible to admins with access to opportunities. |
| 2 | Add note | Lets you add the new note to the opportunity's record. |
| 3 | Copy last note | Lets you copy the text in the latest note in the opportunity's record. |
| 4 | Search bar | Lets you find the relevant notes by typing one or multiple keywords. |
| 5 | Delete note icon | Lets you delete the relevant note in the opportunity's record. |
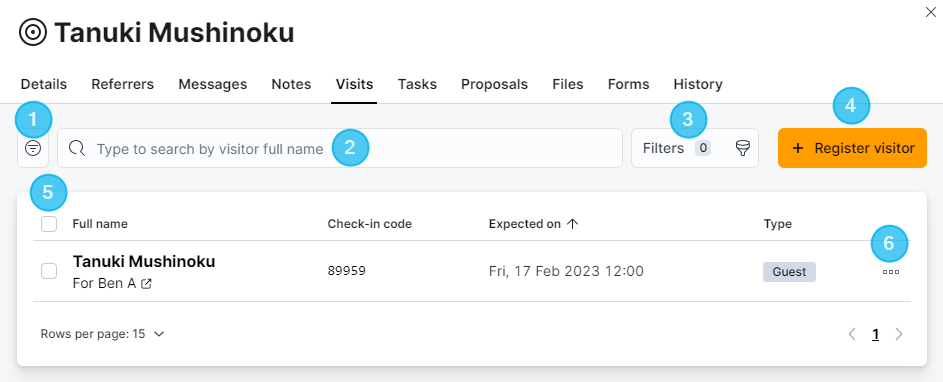
Visits
This tab lets you manage the opportunity's visits to your space.
| Number | Name | Details |
|---|---|---|
| 1 | Views | Lets you quickly filter the opportunity's visits. |
| 2 | Search bar | Lets you find the relevant visits by typing one or multiple keywords. |
| 3 | Filters | Lets you filter the opportunity's visits by the following:
|
| 4 | Register visitor | Lets you register the opportunity as a visitor and schedule a visit. |
| 5 | Checkbox | Lets you select multiple visitors to trigger one of the available options in the Bulk actions menu. You can:
|
| 6 | Lets you:
|
Tasks
This tab lets you manage all the tasks linked to an opportunity.

| Number | Name | Details |
|---|---|---|
| 1 | Views | Lets you quickly filter the opportunity's tasks. |
| 2 | Search bar | Lets you find the relevant tasks by typing one or multiple keywords. |
| 3 | Filters | Lets you filter the opportunity's tasks by the following:
|
| 4 | Add task | Lets you add a new task directly from the opportunity's record. |
| 5 | Checkbox | Lets you select multiple tasks to trigger one of the available options in the Bulk actions menu. You can:
|
| 6 | Lets you mark a task as complete or delete the task. |
Proposals
This tab lets you access all the proposals linked to an opportunity.

| Number | Name | Details |
|---|---|---|
| 1 | Views | Lets you quickly filter the opportunity's proposals. |
| 2 | Search bar | Lets you find the relevant proposals by typing one or multiple keywords. |
| 3 | Filters | Lets you filter the opportunity's proposals by:
|
| 4 | Add propsal | Lets you add a new proposal directly from the opportunity's record. |
| 5 | Checkbox | Lets you select multiple proposals to trigger one of the available options in the Bulk actions menu. You can:
|
| 6 | Status | Lets you know the status of the proposals linked to an opportunity from the following:
|
| 7 | Lets you:
|
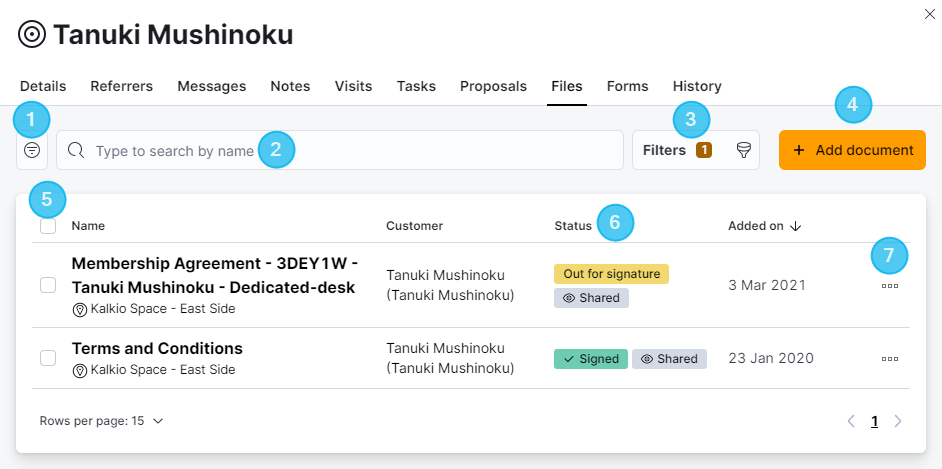
Files
This tab lets you see all the documents associated with an opportunity.
| Number | Name | Details |
|---|---|---|
| 1 | Views | Lets you quickly filter the opportunity's documents. |
| 2 | Search bar | Lets you find the relevant documents by typing one or multiple keywords. |
| 3 | Filters | Lets you filter the opportunity's documents by:
|
| 4 | Add document | Lets you add a new document directly from the opportunity's record. |
| 5 | Checkbox | Lets you select multiple documents to trigger one of the available options in the Bulk actions menu. You can:
|
| 6 | Status | Lets you know the status of the documents linked to an opportunity from the following:
|
| 7 | Lets you send or download the document. |
Forms
This tab lets you see the forms associated with an opportunity.
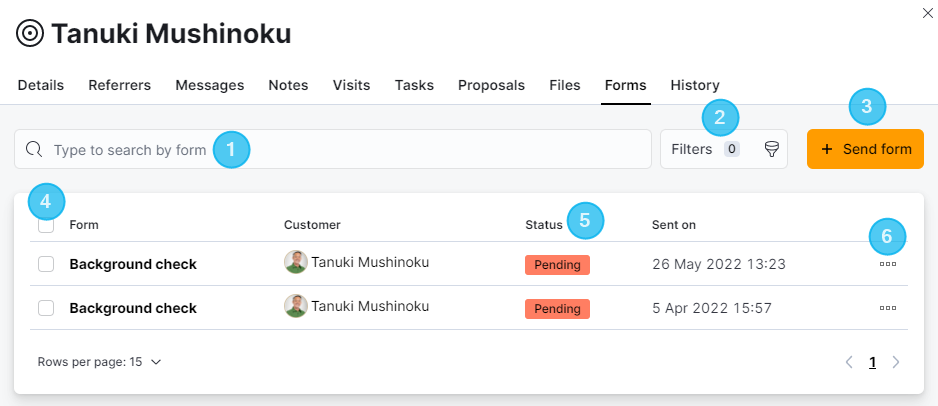
| Number | Name | Details |
|---|---|---|
| 1 | Search bar | Lets you find the relevant forms by typing one or multiple keywords. |
| 2 | Filters | Lets you filter the opportunity's forms by:
|
| 3 | Send form | Lets you add a new form directly from the opportunity's record. |
| 4 | Checkbox | Lets you select multiple forms to trigger one of the available options in the Bulk actions menu. You can:
|
| 5 | Status | Lets you know the status of the forms linked to an opportunity. Pending means the form has been sent to the customer. Submitted means the customer has sent a response. |
| 6 | Lets you send the form request again. |
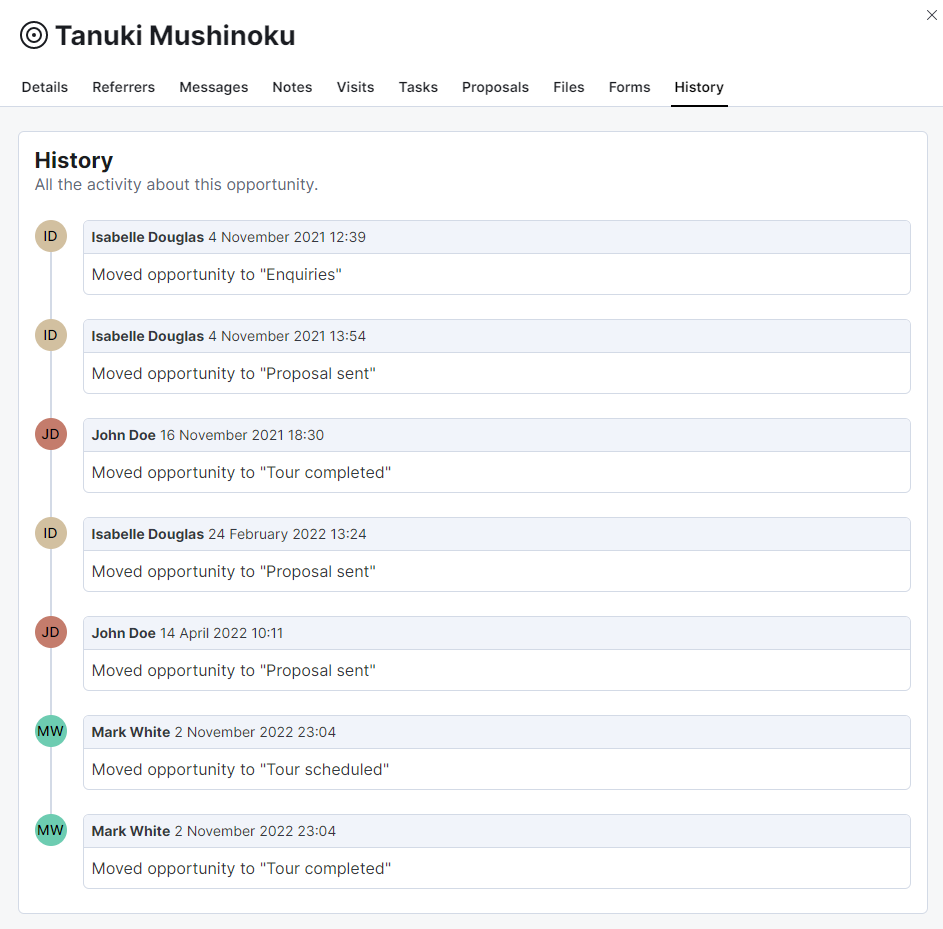
History
This tab lets you see the opportunity's movement on the CRM board.