If you use any other controller vendor, just follow Integrating RADIUS.
Ruckus Cloud
You will first need to create a new network in IronWifi.
-
Log in to the IronWifi console.
-
Create a new network.
-
Create a new captive portal, making sure you select Ruckus NBI as the vendor.
Once your network and its captive portal are created in IronWifi, you can move to the Ruckus configuration.
-
Log in to your ruckus cloud dashboard at cloud.ruckuswireless.com.
-
Go to Networks and create a new network with the following settings:
Network Name - Guest Wifi or any other name of your choice
Type - Captive Portal
- Click Next and continue the configuration with the following settings:
Captive Portal Type - 3rd Party Captive Portal (WISPr)
- Click Next and continue the configuration with the following settings:
Portal Provider - IronWifi
Captive Portal URL - your Splash page's URL
Go to Settings > Integrations > Radius and click on your RADIUS license.
Integration Key - copy and save this key somewhere safe, you will need it later in the setup process
Walled Garden List - 107.178.250.42
You will also need to include the following addresses to your Walled Garden list
- XYZ.spaces.nexudus.com where XYZ matches your default web address in Nexudus.
- 107.178.250.42/32
- 216.239.32.0/19
- 64.233.160.0/19
- 72.14.192.0/18
- 209.85.128.0/17
- 66.102.0.0/20
- 74.125.0.0/16
- 64.18.0.0/20
- 207.126.144.0/20
- 173.194.0.0/16
-
Click Next and select which Venue to apply the configuration.
-
Toggle on the venue to Activated.
If you are asked to select which AP's to apply to, choose All APs unless you have a specific requirement.
-
Click Next to confirm your setup.
-
Click Create to complete the setup process.
Go back to the IronWifi console, and add the following values in your captive portal settings to link it to your controller.
Controller username - api
Controller password - paste the integration key that you saved in step 4
Vendor - Ruckus NBI
Your setup is complete. We recommend you check the setup is working properly by trying to log in to the network as a customer.
Ruckus Flex
- Create a new network with the following attributes

- Go to Services > AAA Servers.

- Edit radius1 and add all the necessary information from your console.

-
Edit radius1-acct and add all the necessary information from your console.

-
Edit remu1 and set Accounting Server to radius1-acct.

-
Go to Services > Hotspot Services and edit remu.

-
Add your splash page’s URL in the Login Page field and make sure all your settings are identical to the ones in this picture.

-
Click on the WalledGarden tab and add the following addresses.
- XYZ.spaces.nexudus.com where XYZ matches your default web address in Nexudus.
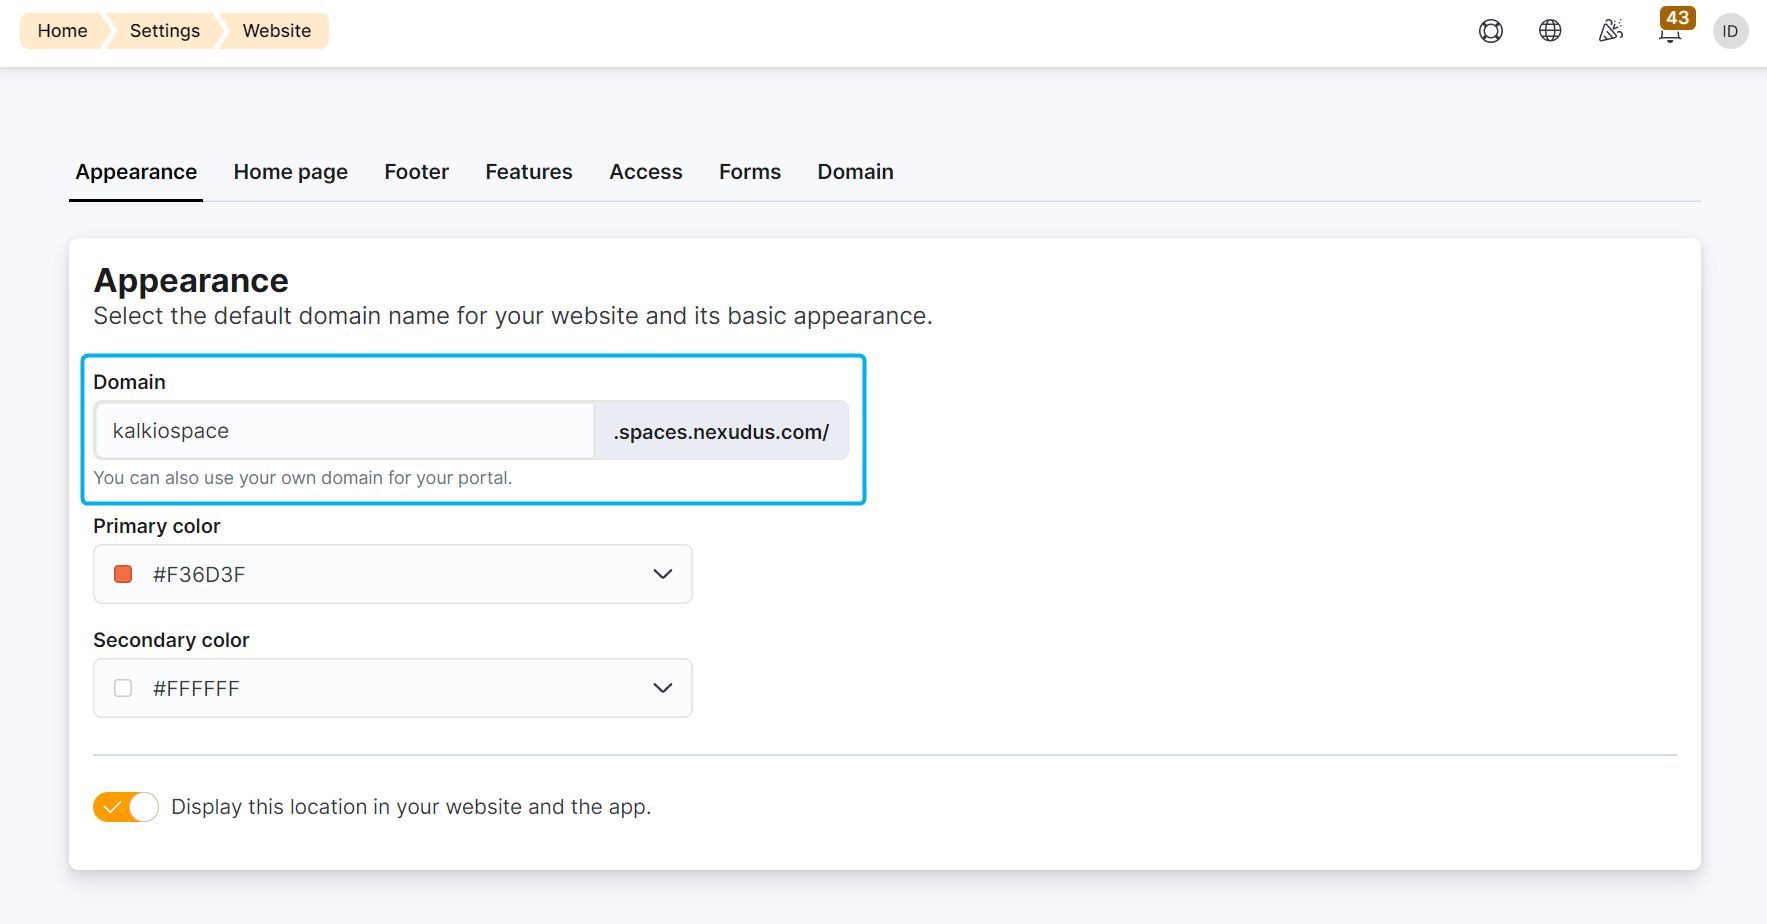
You can easily find it viaSettings > Website on the Admin Panel.
- 107.178.250.42/32
- 216.239.32.0/19
- 64.233.160.0/19
- 72.14.192.0/18
- 209.85.128.0/17
- 66.102.0.0/20
- 74.125.0.0/16
- 64.18.0.0/20
- 207.126.144.0/20
- 173.194.0.0/16

Disabling MAC address encryption
As a security measure, MAC address encryption is enabled by default on the Ruckus infrastructure, which makes it impossible to reauthenticate users based on their MAC addresses. Here is how you can disable this MAC address encryption.
- Log in to your Ruckus virtual controller CLI as a privileged user and run the following command to validate the status of this security feature.
# show running-config encrypt-mac-ip
- Toggle on the config mode and disable the feature by running the following commands.
# config

(config)# no encrypt-mac-ip
You will be prompted to confirm the command execution.
- Confirm that the feature has been disabled by running the following commands from the config mode as shown below.
(config)# do show running-config encrypt-mac-ip
All done! The MAC address encryption is disabled and the MAC-based reauthentication feature should now work.
Your setup is complete. We recommend you check the setup is working properly by trying to log in to the network as a customer.