Each automation tile you create can trigger one of the following actions when scanned:
- Check customer in
- Check customer out
- Check in at booking
- Check in at event
- Extend current booking(s)
- Make HTTP request
- Mark resource as cleaned
- None
- Place or terminate a booking
- Place or terminate a desk booking
- Redirect user to URL
- Show new booking form
- Unlock Act365 door
- Unlock DoorDeck door
- Unlock KISI door
- Unlock Smartalock locker
We've detailed what you need to know about each available action below.
Check customer in
Scanning the tile checks the customer in if they have a valid pass. You don't need any specific details to set up this tile.
Check customer out
Scanning the tile checks the customer out if they were already checked in. You don't need any specific details to set up this tile.
Check in at booking
Scanning the tile checks the customer in to their booking for the defined resource.
You need to add the relevant resource's ID to the Nexudus Resource field when setting up the tile. For more details, check out Finding Resource IDs.
Check in at event
Scanning the tile checks the customer in to the relevant event. You don't need any specific details to set up this tile.
Extend current booking(s)
Scanning this tile extends the customer's current booking by the number of minutes defined in the tile.
Make HTTP request
Scanning the tile triggers a request from the Nexudus servers to a URL. This URL isn't visible to the user.
The data available as part of the POST requests contains the name of the tile as well as the details of the customer who scanned the tile. You can sign these requests using a shared secret.
Mark resource as cleaned
Scanning the tile marks the resource as cleaned in NexBoard if you enabled the toggle to show the last time the resource was cleaned.
You need to add the relevant resource's ID to the Nexudus Resource field when setting up the tile. For more details, check out Finding Resource IDs.
None
Scanning the tile doesn't trigger any type of action in Nexudus and displays an error message to the user. Use this action to quickly disable a tile that was stolen or that you no longer use but don't want to delete yet.
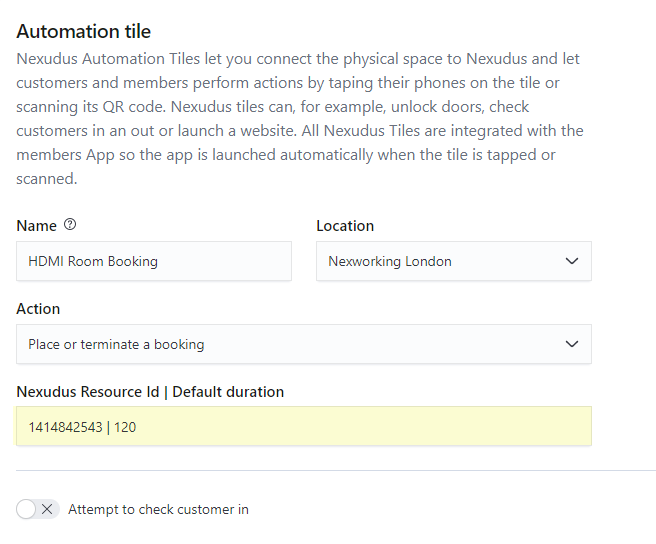
Place or terminate a booking
Scanning the tile for the first time starts a booking for the user. Scanning the tile a second time with the same user ends the booking.
You link each tile to a resource and define a default booking length for bookings started using the tile.
You need to add the relevant resource's ID to the Nexudus Resource ID field when setting up the tile. For more details, check out Finding Resource IDs. You then need to add a vertical line symbol | followed by the default booking length you want to apply.
For example, if a resource can booked from 9a.m to 1p.m, 1p.m to 5p.m or 9a.m to 5p.m and the tile is scanned at 9:05am, Nexudus will book the resource from 9 a.m. to 1 p.m. as that is the first shift in the list based on the current time.
Place or terminate a desk booking
Scanning the tile for the first time starts a desk booking for the user. If the same user scans the tile a second time, the desk booking ends.
You need to add the relevant desk's ID in the Nexudus Desk ID field when setting up the tile. For more details, check out Finding Floor Plan Item IDs. You then need to add a vertical line symbol | followed by the default booking length (in minutes) you want to implement.
For example, if a resource can booked from 9AM to 1PM or 1PM to 5PM and the tile is scanned at 9:05AM, Nexudus will book the resource from 9a.m to 1p.m as that is the first shift in the list based on the current time.
Redirect user to URL
Scanning the tile sends the user to the URL defined in the tile. Customers are always asked to log in before accessing the URL.
Show new booking form
Scanning the tile takes the customer to the booking form for the relevant resource.
You need to add the relevant resource's ID to the Nexudus Resource ID field when setting up the tile. For more details, check out Finding Resource IDs. You then need to add a vertical line symbol | followed by the default booking length you want to apply.
Just add the unit ID between the resource ID and default booking length.
For example 235205541|1085642398|60
Unlock ACT365 door
Scanning the tile unlocks the selected door controlled by ACT365.
You need to copy the relevant door ID that can be found in your ACT365 account and paste it to the Access Control Lock/Door Unique Id field when setting up the tile.
QR codes and NFC chips can be spoofed, meaning they can be cloned and reprinted by potential intruders to replace existing tiles with a tile connected to a different door.
Simply put, users scanning the replaced tile would unknowingly open a different door, granting intruders access to the door.
Automation tiles are an easy, inexpensive, and relatively secure way to control access to areas such as meeting rooms or break rooms in your space. Make sure you always geofence your tiles as tightly as possible to mitigate risks.
Unlock Doordeck door
Scanning the tile unlocks the selected door controlled by Doordeck.
You need to copy the relevant door ID that can be found in your Doordeck account and paste it to the Access Control Lock/Door Unique Id field when setting up the tile.
QR codes and NFC chips can be spoofed, meaning they can be cloned and reprinted by potential intruders to replace existing tiles with a tile connected to a different door.
Simply put, users scanning the replaced tile would unknowingly open a different door, granting intruders access to the door.
Automation tiles are an easy, inexpensive, and relatively secure way to control access to areas such as meeting rooms or break rooms in your space. Make sure you always geofence your tiles as tightly as possible to mitigate risks.
Unlock KISI door
Scanning the tile unlocks the selected door controlled by Kisi.
You need to copy the relevant door ID that can be found in your Kisi account and paste it to the Access Control Lock/Door Unique Id field when setting up the tile.
QR codes and NFC chips can be spoofed, meaning they can be cloned and reprinted by potential intruders to replace existing tiles with a tile connected to a different door.
Simply put, users scanning the replaced tile would unknowingly open a different door, granting intruders access to the door.
Automation tiles are an easy, inexpensive, and relatively secure way to control access to areas such as meeting rooms or break rooms in your space. Make sure you always geofence your tiles as tightly as possible to mitigate risks.
Unlock Smartalock locker
Scanning the tile once will open an available locker in the locker bank. Scanning the tile a second time will open the same locker in the locker bank.
You need to copy your locker bank ID that can be found in your Smartalock account to set up the tile. You also need to enable the Smartalock integration before setting up your tile.