Your printing pricing must be set up in both PaperCut and Nexudus. This guide takes you through the different steps required to price PaperCut prints.
You can choose from one of the following pricing setups:
Pay-per-print Only
Customers are charged for all their print jobs based on the cost per page defined in PaperCut. Printing credits are not available and customers pay for all their prints.
For example, you want customers to be able to print as much as they'd like, without any type of credits, and charge them for all their print jobs.
Printing Credits Only
Customers can only print if they have enough printing credits in their account. Once they run out of printing credits, Nexudus won't let them print unless they purchase a product that includes printing credits, they receive printing credits as plan benefits or an admin manually adds printing credits to their account.
For example, customers get $50 worth of printing credits as benefits from their monthly plan. You don't want them to be able to print once they use up their $50 worth of printing credit, unless they purchase additional products or plans that include printing credits as benefits.
Printing Credits & Pay-per-print
Customers print using printing credits until they run out. If they don't have enough printing credits, Nexudus will charge and invoice them for their print jobs.
For example, all members get $20 worth of printing credits through their plans. If they run out of printing credits before theeir plan is renewed, you still want them to be able to print, but you want to charge them per print instead of relying on printing credits.
PaperCut Setup
Regardless of how you want to price prints, you need to set up the cost per page for each print type you have in PaperCut. You can apply different costs per page based on the type of print and the printer used by your customers.
For example, if you define the cost per page for A4 black and white prints to 5 credits in Papercut, you'll be able to charge customers either 5 credits or $0.05 per print in Nexudus.
Similarly, if you define the cost per page for A3 color prints as 50 credits, you'll be able to charge customers either 50 credits or $0.50 per print in Nexudus.
For more details, check out Papercut's pricing tutorial.
Once you have your costs per page defined in PaperCut, you can move to the pricing setup in Nexudus.
Pay-per-print Only
This setup lets you charge and invoice customers for all their print jobs without relying on printing credits.
In order to charge customers for their prints, you need a product dedicated to printing in Nexudus. This printing product will used by Nexudus to charge and invoice customers for their print jobs.
You should already have a printing product in your inventory that you created for the Extender connection.
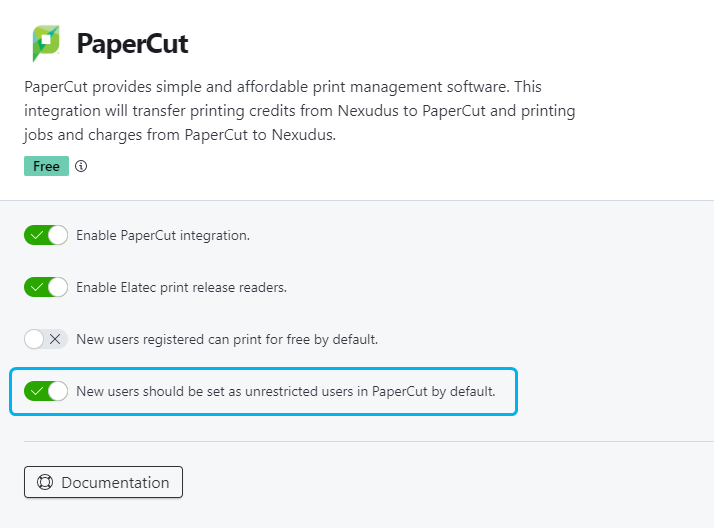
You also need to make sure that the integration allows users to be unrestricted under Settings > Integrations > PaperCut.

Once that's done, you're all set!
Printing Credits Only
This setup only lets users print if they have enough printing credits in their account. Customers will never be charged or invoiced for their print jobs and they simply won't be able to print if they don't have enough printing credits in Nexudus.
You should already have a printing credit and credit printing type set up after enabling the integration.
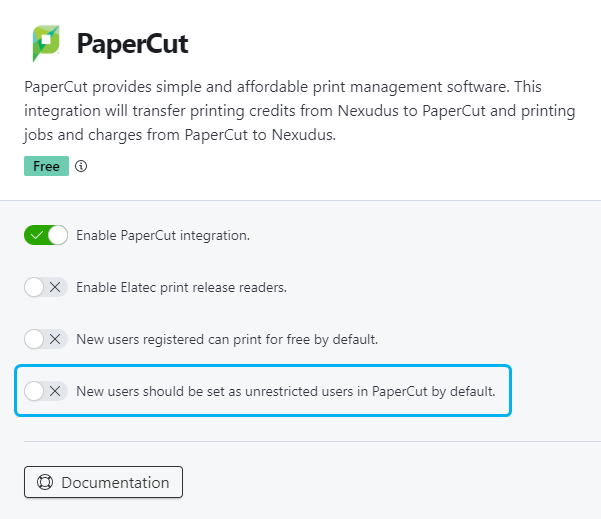
Once you have the printing credit and its type ready, you also need to make sure that the integration doesn't allows users to be unrestricted under Settings > Integrations > PaperCut.

The last step of this setup is making sure that you add printing credits to items sold to customers or directly to customer accounts.
For more details, check out Managing Printing Credits
Once that's done, you're all set!
Pay-per-print and Printing Credits
This setup lets your users print using printing credits and have them pay for their prints once they run out of printing credit. Nexudus will always try to cover print jobs with printing credits before charging per print.
You should already have a printing credit and credit printing type set up after enabling the integration. You now need to make sure that you add printing credits to items sold to customers or directly to customer accounts.
For more details, check out Managing Printing Credits
You should also already have a printing product connected to PaperCut through the extender.
The last step of this setup is to allow unrestricted PaperCut users under Settings > Integrations > PaperCut.

Once that's done, you're all set!